XamarinXamarin Tutorial For Creating Data Visualization Applications
TutorialLearn how to develop high-performance charting applications with Xamarin.Forms
What is Xamarin?
Xamarin.Forms is a cross-platform UI toolkit that allows us to create user interfaces that can be shared across Android, iOS, and Windows apps. Forms are part of the Xamarin ecosystem, which is a set of tools and technologies for building mobile applications.
1. Cross-Platform Development: Xamarin.Forms helps to write user interface code once in C# and XAML, and then share that code across multiple platforms. This approach reduces the amount of platform-specific code, saving time and effort in code.
2. Native Performance: While Xamarin.Forms allow for code sharing, and the applications still run as native apps on each platform. This means they have the performance and feel of native applications.
3. Rich Library of Controls: Xamarin.Forms provide a bigger range of common controls (like buttons, labels, lists, etc.), which are mapped to native controls on each platform. Also, we can create custom controls or use third-party libraries to improve the applications.
4. MVVM Support: Xamarin.Forms support MVVM architecture which makes easy the separation of concerns and makes the code more maintainable and testable.
5. Extensibility and Customization: Developers can extend Xamarin.Forms to access native platform features that are not directly exposed by the Forms API. They can also customize the appearance and behavior of controls to adhere to the platform-specific design guidelines.
6. Transition to .NET MAUI: Xamarin.Forms are evolving into .NET MAUI (Multi-platform App UI), a more modern and versatile framework for building cross-platform apps with .NET. .NET MAUI includes all the benefits of Xamarin.Forms while adding new features and improvements.
Project Overview
Previously, we have developed mobile applications using frameworks such as Ionic-Capacitor and Android Studio. But today it’s time to do an exercise with Xamarin Forms.
In this article, I will explain how to make a project from scratch, showing the relationship between the files of this project. Xamarin Forms is a UI framework that allows the development of mobile applications, for Android and iOS platforms, and even Windows applications.
While in other frameworks we need Visual Studio code, here we will work with Visual Studio. This is a great advantage for developers who work with this IDE.
The structure of a Xamarin project is very familiar to any other project created in Visual Studio. Within this project, we will see the typical structure of views, models, services, assets, etc.
The important point here is that we will use the C# language as the main programming tool. In this article, we will create a Pie chart and a Bar chart. These charts have their own articles, so we’ll focus more on developing the Xamarin App.
Remember that you can download the complete template in this article. I recommend that you do it as there will be files that you will need later. Before we begin, it is important to clarify that you will need to install all Xamarin plugins, through the Visual Studio installer. Let’s get started!
 Download the project to follow the tutorial
Xamarin Project Settings
When starting Visual Studio, we will go to the New Project option. We can filter the list of projects with mobile app. We will choose the project [Mobile App (Xamarin.Forms)]

We will assign a name. For this example, we will use LCAppExample.

Xamarin provides default templates. You can select the template with a side menu, tabbed navigation, or a completely empty project. We will choose Flyout.

We will have other options available. We can choose the Platform for which we want to develop our application. In this case, we will only choose Android. If you select all the platforms, a project will be created for each one of them.
Xamarin Project
Once our project is generated, we will see a structure equal to or similar to the following. In the first Project, we will have our structure of models, services, and views. In this project, we will be able to have our business, services, and data layer, which can be shared between the three different types of platforms available.
In the second “.Android” project, we will have the necessary resources to compile an application for this platform. This is where we’ll have our app and UI layers, as well as our Android, iOS, and Windows assemblies.

ViewModels
View models (MVVM) typically expose command properties, for binding from the view, which are object instances that implement the ICommand interface. We will create two view models:

BarChartViewModelPieChartViewModel: The ICommand allows you to share your ViewModels between Windows applications and Xamarin. Forms applications.
public PieChartViewModel()
{
	Title = "Pie Chart";
	OpenWebCommand = new Command(async () => await Browser.OpenAsync("https://aka.ms/xamarin-quickstart"));
}

public ICommand OpenWebCommand { get; }
Views
Views function as a user interface. Views are generated via XAML files, much like WPF projects. Within these files, we can create objects such as buttons, selectors, text fields, etc. We will also be able to execute methods hosted on the CS side of these files.

We make a binding to the View-Model corresponding to the view:
<ContentPage.BindingContext>
	<vm:BarChartViewModel />
</ContentPage.BindingContext>
We create a button, which will execute the [createBarChart] method. This logic will apply equally to the Pie Chart. We create a WebView element. WebView can display content from HTML, CSS, and JavaScript embedded within the app.
<StackLayout Orientation="Vertical" Padding="30,24,30,24" Spacing="10">
	<Button Margin="0,10,0,0" Text="Bar Chart" Clicked="createBarChart"
          BackgroundColor="{StaticResource Primary}"
          TextColor="White" />
  <ScrollView>
  	<WebView x:Name="Browser" x:Uid="Browser" VerticalOptions="FillAndExpand" HeightRequest="800/>"
  </ScrollView>
</StackLayout>
We assign an HTML template to our WebView. We create the method [createBarChart]. This method will execute the JavaScript function [createBarChart()], hosted in the “script.js” file located in our Android-Assets project:
public BarChartPage()
{
    InitializeComponent();
    Browser.Source = "file:///android_asset/sample.html";
}

public void createBarChart(object sender, EventArgs e)
{
    Browser.EvaluateJavaScriptAsync(("javascript:ClearAll()"));
    Browser.EvaluateJavaScriptAsync(("javascript:createBarChart()"));
}
If we open the “sample.html” file, we will see that it calls the JS files of the LC JS library and our function script:

The “target” div will be the container element of our charts.
<div id="target" class="row content"></div>

<script src="file:///android_asset/lcjs.iife.js"></script>
<script src="file:///android_asset/xydata.iife.js"></script>
 <script src="file:///android_asset/script.js"></script>
<script>
Android-Assets
Inside this folder, we will find the iife files of the LC JS library. Both are required to generate a LightningChart chart object.

Script.js will contain the following functions:
ClearAll(): Clears the “target” div, removing any objects drawn in the previous view.
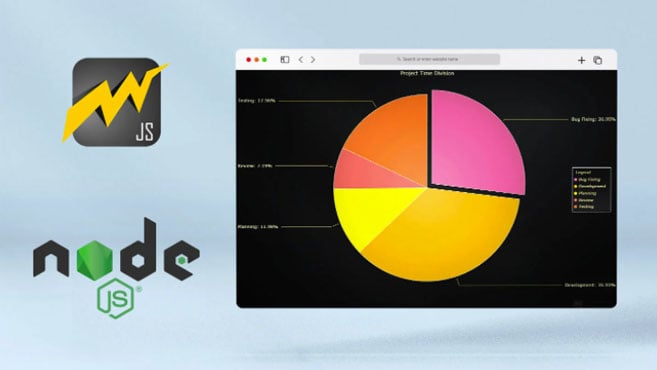
createPieChart(): It will create a chart of type Pie. Practically, you can copy and paste the code from this pie chart example.
It will not be necessary to import LightningChart since it is imported in the HTML. However, it will be necessary to specify the container for this chart. Here’s the explanation of the JS pie chart code.
const pie = lightningChart()
    .Pie({
        theme: Themes.darkGold,
        type: pieType,
        container: 'target'
    })
    .setTitle('Project Time Division')
.setMultipleSliceExplosion(true)- createBarChart(): here’s the bar chart source code and the bar chart code explanation as well.
// Container

const chart = barChart({
    theme: Themes.darkGold,
    container: 'target'
})
Running Xamarin App
Visual Studio provides simulators that help visualize and test our application. Honestly, I recommend connecting a real device to our computer better. This will save us problems when installing a simulator and it will save a lot of disk resources. For your device to be recognized, you will need to enable developer options (Phone Settings) and then enable USB debugging. Visual Studio will recognize your device.

The incredible thing about Xamarin is that it will allow you to debug your C# code, as if it were a normal program. This will help to find bugs and errors in your application.
Conclusion
I currently work as a mobile developer, using Angular, Ionic, and Cordova, among others. I hadn’t had a chance to work on Xamarin, and after working on it, I was amazed. Especially since I love working with Visual Studio.
The most amazing thing was the ease with which I was able to integrate the LightningChart JS code. I didn’t need any additional frameworks and I only took the source code of the interactive examples, with the aim of verifying how extremely easy and practical Lightning Chart JS is.
Unfortunately, Xamarin will no longer be supported until May 1, 2024; but I still recommend giving Xamarin a review, as it will surely serve as an introduction to MAUI.
Probably in the future, we will give a revision to MAUI because LightningChart JS will also run without problems in this framework. If you made it this far, thank you very much!
Bye!

Omar Urbano
Software Engineer
Continue learning with LightningChart
If you have any questions, feel free to contact us!